Filet crochet shawl


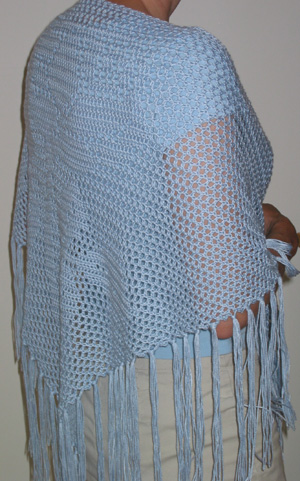
My mother sent me the link to this shawl from Woman’s Day Magazine. Since she’s never asked me to make her anything before, I hopped right on it. The first challenge was finding the materials. No one sells J. & P. Coats LusterSheen locally, but I was finding something from Red Heart also called LusterSheen which surprisingly had the exact same color names. Since this seemed like a trademark violation I checked with r.c.t.y and got confirmation that they were the same thing (possibly Red Heart bought out J & P Coats?).

Having found the materials I needed, I started crocheting. The next trouble was that my gauge was off quite a bit. My squares were coming out rectangular. It didn’t matter if I went up or down a hook, I just ended up with larger or smaller rectangles. So I ended up modifying the pattern to use HDC instead of DC which made my squares square. I was afraid it might make the shawl too short, but it came out exactly the length Woman’s Day said it should. After all of the prep work, crocheting the shawl was a breeze.


Here’s a close up of the filet work. I’d never done filet crochet before but that turned out to be the easy part. I’ve done plenty of counted cross stitch and it’s pretty similar – just count the squares and fill in the ones that are filled in on the pattern. I think this photo is a more accurate representation of the color.

Barbie wardrobe


The pattern included scrubs for both Ken and Barbie. Ken had green scrubs and Barbie had pink. The hell with that. Barbie doesn’t have to be a nurse. Everyone on ER wears blue. Besides, blue was what I had. This was a McCall pattern. Making that pocket was tricky. It’s just so tiny! Then came an even thornier problem: getting the elastic through the waistband. I know the principal of threading elastic. You scootch it through with a safety pin. But where to find a safety pin small enough to go through a 1/4″ tunnel? I must have spent an hour trying to thread that elastic.


I love this fabric but not this dress. This was a Simplicity pattern and they tend to use shortcuts. In this case, gathers instead of pleats. It makes for a bunchy waistline that doesn’t drape well. I have a very similar pattern from Vogue with pleats that came out much nicer when I made it.


The coat has very short sleeves. That’s because the pattern fooled me (for the second time – more fool me). It says 5/8″ seam allowances unless otherwise noted. I was so excited about it too. I don’t care how small Barbie is, working with 1/4″ seam allowances is tricky on your own fingers, especially with any kind of fabric that wants to unravel. But on the next page it says 1/4″ seam allowances unless otherwise noted.

So I had done the first few steps which joined the back to the sides (and clipped the seams, of course) when I got to the collar and realized that if I took 5/8″ off of each side it was going to meet in the middle. That’s when I found the second note. It didn’t seem to make a whole lot of difference in the fit except that the sleeves came out so short, which is odd because I hadn’t hemmed the sleeves yet. Now I’ve crossed out the 5/8″ note and circled the 1/4″ note so that it doesn’t fool me the third time I use a pattern from this envelope.

This was from the Vogue envelope. Vogue doesn’t take shortcuts with Barbie. She gets linings and darts and pleats and pretty much everything you’d expect from a real pattern except set in sleeves (and 5/8″ seam allowances).


Her belt/waistband is actually a piece of ribbon. That’s a pretty common solution to the problem of how to make what would be skinny pieces even for humans. It’s not always easy finding 1/4″ or smaller ribbon to match whatever project you’re working on though. I think this dress is lovely. I believe it was from one of the Simplicity envelopes.

Chair reclaimed from trash


Twice a year my town has what we call “big trash day” where you can put out large items for collection. Pickup trucks and strollers will cruise the neighborhood, checking out the sidewalk sale. On the last big trash day, I contributed a couple of items that were claimed almost immediately. Then Todd and I took a walk around to see what there was to see. We found this chair in perfectly good shape except it had no seat. I really needed a chair for my sewing table at Todd’s house. I was actually using a folding chair. So we grabbed it for rehabilitation.

Todd made a seat out of plywood for me that fit the gaping hole. Then I added foam and made a cover for it. On the top, I sewed it like a regular seat cushion with contrasting piping and everything. But on the bottom I just folded the fabric over the plywood and stapled. That way you can’t see the plywood. It came out really nicely and it’s very comfortable. Not too bad for free!

Blue baby blanket


This came from a leaflet called Snuggle-Up Baby Afghans. It’s the one with the blue and pink stirpes. I’ve got a couple of upcoming babies and at least one is a boy, so I decided to use all blue. This is a very bright blue for a baby but I like it. They say babies respond better to bright colors so why do we make everything for them out of pastels?

I debated whether or not to add the fringe, I suppose because I don’t really enjoy making fringe, but the waffle texture and stripes made it look a little too much like a dishrag without the fringe. It’s funny how I consider finishing tasks like weaving in ends and adding fringe to be work but crocheting to be fun. The motion for adding fringe is almost exactly the same as for rug hooking, so if I were a rug hooker, that’s what I’d be doing all along and I suppose I’d think it was fun then. Actually, I started a rug once but never finished it, so maybe I just really don’t like that hooking motion!

I’m not very good at getting the fringe all trimmed up evenly and usually end up feeling like I cut it three times and it’s still too short but Todd is concerned that a baby could choke on fringe if it were too long so in this case short fringe isn’t a bad thing (not that I’ve ever heard of a baby fringe choking incident).

Barbie’s blue silk evening gown


I love this gown. I wish I had the tiny waist and long legs to look as good in it as Barbie, not to mention enough of that material to make it. I don’t even know where I got the material from. It was obviously cut from something because there was a seam in it, but I don’t recognize it. At first I thought the other side was the front but then I realized I liked the back side better (I don’t know which one is officially the right side, but it doesn’t matter).

I like making Barbie clothes because they’re fast and Barbie doesn’t complain if I’m a little crooked. Plus I never have to do zippers. Barbie fastens all her clothes with Velcro.

I wanted a white Barbie because I thought this color would look so nice with blond hair but K-Mart charges $2 more for white Barbie than person-of-color Barbie. I can’t decide if that’s prejudice or reverse prejudice but either way it seems wrong. Wal-Mart charges the same.

Basketball booties


I made these from Booties by the Dozen for my soon-to-be nephew Logan. His soon-to-be father is a huge sports fan, so I think they’ll be a hit. I really hate working with thread though, especially black thread. It’s so hard to see the holes or to count stitches and it really strains my eyes.

Here’s a funny story about making these booties. I had started them before and got as far as both soles and one upper. Then I couldn’t stand working with thread anymore and put them away for a while. When I got everything out again, I couldn’t find the spool of black crochet thread, so I walked down to Wal-Mart to buy a new spool. Well, they had every color on earth except black. On my way back home I thought about where that black thread could have gone. I couldn’t have run out of it, so it must be somewhere.

I keep my crochet thread in a plastic tub inside a chest that also holds bedding for the guest room, but I used to keep it in a plastic bag. So I figured that probably the plastic bag had spilled open and the black spool had gotten lost amongst the bedding and hadn’t made it into the tub and if I looked when I got home I’d find it mixed in with the sheets, but if not I’d drive down to AC Moore and buy another spool. Well, somehow when I got home I forgot that I was going to look for the spool in the chest (probably because I like going to AC Moore) so I got straight in the car and went and bought a replacement spool which I promptly started using to make the second upper.

Now for the tragedy: when I’d finished the second upper and held it against the first to make sure my gauge hadn’t changed, I realized that they weren’t quite the same color of black. There’s black and then there’s really black and the first one was only black whereas the second one was really black. So I had to make the first upper over again using the new thread. And the kicker is that when I went and looked, the old thread was right where I figured it had to be.

So chalk up one walking trip, one driving trip, $2.39 for a spool of thread, and one extra upper to the mistake of not thoroughly looking in the first place.

In case you hate working in thread as much as I do, I found a place online (Laydeebug) selling what I’m pretty sure are these same booties, only made for you already. Believe me, I considered it!

Puppets


I made these four puppets from a book called Puppet Mania for my nephew’s first birthday. Really, he’s too young for puppets but we can do the puppets and I think he’ll like watching them move.

The book has a wide variety of puppets all made with “common household items” and basic craft supplies. I personally had none of these things in my house and you just try to find an all-white tube sock these days.

Mostly I learned that I’m not very good with a glue gun as I tend to get things glued on lopsided but since Noah’s only one, he’s not going to be complaining and they’re all cute in a very homemade kind of way. Here are some close-ups.


Sock puppet. This guy has the most adaptable facial expressions which makes him the most fun to play with but finding an appropriate sock was pretty tricky.


Turtle. In a prime example of not gluing things on straight, this poor turtle’s shell isn’t centered over his body. His head can retract though.


“Where did the turtle go?” This was Noah’s favorite puppet, mostly due to the large googley eyes. He kept trying to pull them off.


Generic monster. I don’t know why he has a wedge shaped mohawk. It just worked out that way. This design allows you to use one body with swappable heads but I only made one head so I permanantly attached it.


Rabbit. You put your fingers in the legs for this one. I should have used a longer pile fur as he came out a little threadbare. It’s hard to cut and glue fur and not end up losing a lot of hair at the seams.

Last of the Special Stitches Scarves


These are the last four patterns from the Special Stitches Scarves booklet, which I had a lot of fun with. Here are links to the others:

Special Stitches Scarves, patterns 1 – 4

Special Stitches Scarves 5 & 7

In general the patterns were interesting and varied and worked up nicely. They tended to be wide considering today’s trend towards skinny scarves, partly because each pattern had a round of SC, a round of DC, and another round of SC as a border, which adds a lot of width. I rarely did the entire border, either not adding a border at all where appropriate or just a round of SC to finish it off.

It’s hard to see texture in a digital photo but almost all the patterns were textured.

Polymer clay cookie cutter ornaments

These I think came out just adorable. For my first efforts with polymer clay I decided to start with stamping shapes out with cookie cutters, seeing as I’m not that artistic. The books make it sound awfully easy to make characters – just make a ball, now add a square, etc. But experience tells me it always takes more artistic ability than they let on.


So first I made a tree. Using the pasta maker to roll out sheets is fun! I made tiny little Christmas tree lights and strung them on, then balls of different sizes to fill in. The hardest part was the star on top. I didn’t have a cutter that small so I had to free hand it. This was the best of about a hundred tries.


Next I made a gingerbread man. Isn’t he cute? And so simple too. My favorite part is his curly hair. It was cuter before but I accidentally broke a little bit off trying to force a hanger through the hole.


Lastly I made a star. At first I couldn’t decide what to do with the star shaped cookie cutter. How do you decorate a star? Just a shape cut out of clay would be pretty dull. I thought about painting it and adding glitter but then I had an inspiration. I decided to make it look like a star shaped Christmas cookie of the sort we used to make every Christmas when I was a kid. So I applied “frosting” made out of a couple of different shades of red/pink, not fully blended to give it a swirly look. And then I made a bazillion little white shots. Yes, each of those is clay! The brilliant part of this idea is that any imperfections only add to the authenticity. I should have made one with multi-colored shots plus silver balls and green sprinkles on top of red and yellow swirled frosting, which would have been a more accurate representation of the kind of work we did as children.

All in all, I’m not sure I like working with clay. A lot of time is spent house-keeping. Either warming the clay up or cooling it down or cleaning it off your hands and your tools so you can work with the next color. But I do like how these came out and there are so many fun ideas out there, I’ll probably try it again.

Ugly cloth ornaments


When Todd saw these in the book he said, “I don’t know. They look kind of bunchy.” Well, he was right. These are made by taking two cloth circles and trying to ease them around a styrofoam ball. The result is kind of bunchy. Add to that the difficulty of getting everything square and centered (it’s hard to find the middle of a ball) and the results are crooked and, yes, bunchy.

I made three because I kept coming up with ways to do the easing better and/or do the math better but the results got only slightly better for all that work. In the end (the green one) I was hand-sewing the two circles of cloth together and pinning and marking every conceivable measurment. And it’s still not so cute. One thing that would help, I think, is to use cloth with smaller scale patterns. The green velvet with silver applique flowers turned into green with random silver blobs once it was disected into quarters. That’s why I added the rhinestones.

I will say that they look much cuter lying down than they do hanging up.