| Climbing Areas | ||
| California | ||
| Colorado | ||
| Nevada | ||
| New Hampshire | ||
| New York | ||
| Tennessee | ||
| Utah | ||
| West Virginia | ||
| Outside the US | ||
| Aconcagua | ||
| Canada | ||
| Caymans | ||
| Mexico | ||
Climbing FAQ | ||
Articles | ||
Best of Rec.Climbing | ||
About Tradgirl | ||
by John Byrnes, April 2003
Important! - Bolt Warning
Adventure (Serious) Sport Climbing at the Point!
- Climbing at the Point and Edd's Place can turn into a serious situation should something go wrong. Remember that unless there are some other climbers around, no one else on the island can rescue you but you!
-
The rappel approaches present some unusual challenges for many climbers, especially since many of them overhang. Also, you will be rappelling on a single rope. Depending on your rap device, you may want to add friction to the system. We suggest the following procedure for first-timers.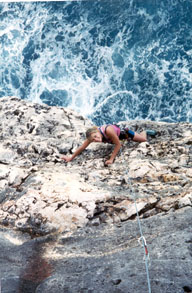 Sue Rusch enjoying
Spermy the Whale (5.11c/d)First of all, evaluate the surf conditions before rappelling. Be sure your targeted belay stance isn't being hammered by big waves. If it is, you might choose another route or one of the inland areas for the day.
Anchor one end of your rappel rope to a tree or thread on the top of the bluff. Then tie a figure-8 on a bight with enough slack to reach the bolt anchor that's over the edge of the cliff. Clip your harness into this knot to protect you when downclimbing to the bolt anchor. You might want to protect this section of rope with a piece of hose or other padding (There are chunks of garden hose in the shed at Bluff View house.). Leaving about 10' of slack between knots, tie another 8-on-a-bight to anchor the rope to the bolts using two quick draws.
If you are the first person to rappel, clip the free end of the rappel rope into the back of your harness to keep it out of the sea. If it's windy, feed the rope from a bag or coil. As you descend, clip the rape line into the bolts in order to stay close to the cliff; if you don't, you may end up hanging 15' from the wall and 30' above the water!. When you get to the belay anchors, clip yourself in and tie in the rap line securely!
The second person to rappel, which will usually be the leader, brings the lead rope down in a bag. This person unclips the rap rope from the draws as he/she descends and (sometimes) ends up hanging over the sea. The first person then pulls them into the belay.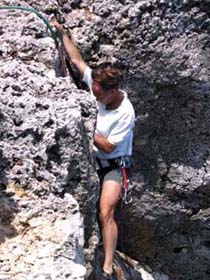 John setting up a rappel at the top of the Point
One of the most common mistakes is to rappel all the way down and then remember that you left the lead rope on the top! To combat this, we've developed the "one-two-three" check before starting the rappel:
1. Am I safe? Check your rap setup, anchors and harness.
2. Am I taking everything I want? Such as the lead rope, draws, ascenders, camera and chalk bag.
3. Am I leaving everything I don't want? Such as sunglasses and hat (you're usually rapping into the shade).
Even when both of you are at the belay DO NOT release the rap line until the leader is off belay at the top of the route and ready to pull it up. This rope is essential for self-rescue (prussik, Tibloc, Ropeman) if for any reason you should not be able to climb the route.
Once the leader is at the top, belay from the anchors below the rim to avoid running the lead rope over any sharp edges. Have the belayer take a small stuff sack that can be clipped to the back of their harness. When they're ready to climb, they can stuff the rope bag (that you carried the lead rope in) into the sack and clip it to the back of their harness.
-
As you probably know by now, the original stainless steel bolts that were used couldn't stand up to the harsh marine environment on the Brac. In November of 2000, a small team of people blitzed the island with new titanium glue-in Tortuga bolts from Ushba Mountaineering. These bolts were developed specifically for marine environments and should provide safe climbing for decades to come. As of this writing there are 46 rebolted routes of every grade at 7 areas.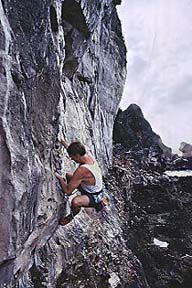 John 'Lord Slime' Byrnes leads Calypso (5.11c)
photo by Ian StewartDO NOT trust any of the old bolts you encounter on the island. They may not look bad, but can fail without warning under less than body weight. The only safe bolts on the island are the new Tortuga glue-ins.
If you are considering creating new routes, use Tortugas and let us know in advance. Some specialized tools such as a glue gun and bits may be available and we have lots of experience and advice on installation.
A "Ti" in the route description means this route has Titanium Tortuga bolts.
A "C" in the route description means the old bolts have been Cleaned from the route. Feel free to clean any old bolts from climbs that have been rebolted, taking great care not to damage the new bolts in the process. If it doesn't break off in your hand, a bolt can usually be cleaned by removing the nut and hanger and then whacking the stud up and down a few times with a hammer. There is a wrench and hammer in the shed at Bluff View for this purpose.
A "T" in the route description indicates the route area has been Tagged with a yellow marker displayed in an obvious place to help orient climbers at the Point climbing areas.
See also: The Devil and the Deep Blue Sea for more information on the new bolts.
-
The Brown Boobie is a rare, threatened and protected species that climbers must be considerate of. They nest on top of the Bluff and on ledges in colonies, small groups or sometimes alone. In general the climbs are in areas where there are no birds, but it is possible you may find a nest on the top of the Bluff, or on a belay ledge. If you find a nest (a sitting adult, eggs or fledgling) please leave the area immediately without disturbing the birds.
-
You'll need two ropes to climb at the Point, and the longest route requires 19 quickdraws. Eight to ten shoulder-length slings with biners will be useful, always take a few with you when you do a route at the Point. Ascending devices (prussik, Tibloc, Ropeman) should be taken on all routes at the Point.
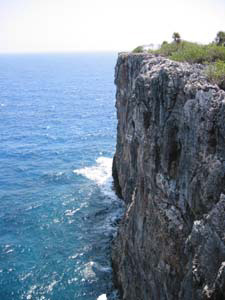 View from the Northeast Point |
-
For the approaches at the Point and Edd's Place we strongly recommend sturdy hiking boots that cover your ankles and a pair of leather gloves to protect your hands. Don't be dismayed by the sharp quality of the rock on the top of the bluff! Once over the edge you'll find much friendlier rock. A foam pad to sit on to change shoes, have a bite to eat, admire the sunset, etc. is an essential luxury.
Bolt counts are listed from bottom to top. At the Point, where rappelling is the means to access the routes, the count is designated as: 2/10/2, meaning there is a 2 bolt belay at the bottom, 10 bolts on the route and 2 bolts at the top.
Due to the surf, wind, and the length and overhanging nature of the routes, you may not be able to hear your partner when climbing at the Point. Establish some rope-tug signals before rappelling.
Routes are listed counter clockwise around the island; meaning routes approached from below are listed from left to right (except Neptune's Lair). Routes requiring rappel access are listed right to left while looking towards ocean.
We've used a four-star rating system to give visiting climbers a rough idea of a route's quality. As always, take difficulty ratings with a grain of sea-salt. On one day conditions will be crisp and a route will feel easy at its given grade; another day, especially right after receiving sea-spray, the route will feel "smarmy" and hard.
 Dawn leading and John belaying on Shiver Me Timbers, 5.10b |